Yogurt is an ancient food that in recent years, has seemed to become an entity unto itself. Walking down the yogurt aisle at any grocery store (yes, it has its own aisle) is an adventure in persuasive marketing.
Every plastic tub begs for your attention because it is more protein-rich, probiotic, or healthier than the plastic tub beside it. Americans spent $7.7 billion on yogurt in 2015 — proving the money invested in such advertising is working.
But should it? Glance at the ingredients label of most yogurts, and you’ll be assaulted by a dizzying array of multi-syllabic materials, a shocking amount of sugar, and the rising suspicion that something is not quite right. And you would be absolutely correct considering the original yogurt recipe was simply milk + culture + time to ferment.
And I guarantee you can make a better version at home most (if not all) of the time. Not only will it taste good, but you will also know it has real ingredients, and you’ll generate less plastic tub garbage. So, let’s declare freedom from the yogurt aisle and learn how to make yogurt at home.
How To Make Yogurt (And Never Buy Store-Bought Again!)
I want to share a delicious revelation with you: the cheapest, tastiest, and truly healthiest yogurt I’ve ever had is the stuff I make every week. The ingredients are simple and pronounceable, and the method is as old-fashioned as yogurt itself. “But I don’t have a yogurt maker!” you may reply. Neither do I. You don’t need one.
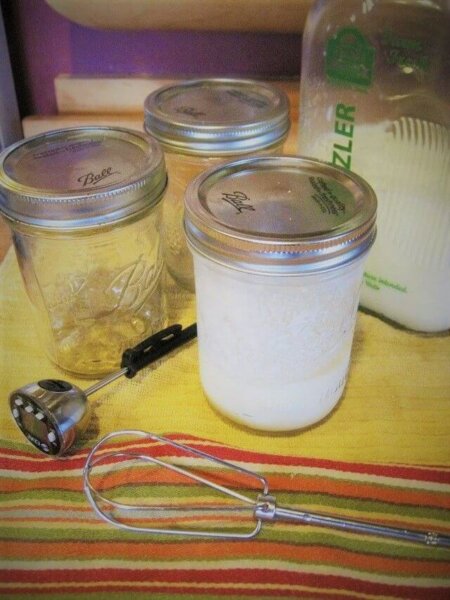
Yogurt is an ancient food. The people who came up with it didn’t have yogurt makers either. Everything you need is already in your kitchen, guaranteed! And don’t be intimidated by having to use your thermometer. After the first couple of rounds, it’s easy. You could wing it without your thermometer (obviously those ancient people did), but I find controlling temperatures gives me really consistent results.
Tools And Supplies
This recipe will yield a little under 4 cups of yogurt.
- 2 pint-sized mason jars with lids
- Small saucepan
- Large pot to hold mason jars
- Meat or candy thermometer
- Whisk
- The best whole-milk you can find (raw milk will by far offer the best consistency and flavor)
- 2 tablespoons of plain yogurt
NOTE: If this is your first batch, get whole-milk active plain yogurt. You’ll only have to buy it once, so it’s okay if it’s pricey. Check the ingredients and avoid all sweeteners, thickeners, and preservatives. The yogurt I first used had organic whole milk, L. Acidophilus, Bifidus, and living yogurt cultures as the ingredient list. P.S. That’s all yogurt SHOULD have in it.
Directions
1. Measure The Milk And Warm It
Measure two mason jars worth of whole milk into your small saucepan. Heat the milk on gentle medium heat, whisking every so often to make sure it doesn’t scorch on the bottom of the pan.
2. Whisk The Milk
Heat until you reach 180 degrees Fahrenheit, then (optionally) lower the heat and try to hold it there for 5 minutes, whisking as much as you need to keep the temperature from going much past 185 degrees. The longer you cook it at this stage, the thicker the end product.
3. Cool The Milk
Turn off the heat and allow the milk to cool to 115 degrees. You can either do this by letting it sit and cool slowly on the stove (about 30 minutes) or by submerging the bottom of the pan in cool water and whisking (about 5 minutes).
4. Fill Your Large Pot With Water
While your milk is cooling, put enough water in the large pot to come up at least two-thirds of the sides of your mason jars. You don’t need enough to cover them. Heat this water to between 110 and 115 degrees, then cover and remove from heat.
5. Add The Active Yogurt
Measure two tablespoons of your really good, active yogurt into one of the mason jars. Pour a little bit of the 115-degree milk in the yogurt and whisk to temper it. Since the yogurt is alive, you want to warm the bacteria before mixing it in the pot so that you don’t shock them. Mix the yogurt milk into your pot and whisk thoroughly to combine.
6. Add The Mixture To Mason Jars
Pour the inoculated milk into your mason jars, and screw on the lid tightly. Immerse the jars into your 110-degree water, cover with a lid, and place the large pot in a warm place for 8 to 15 hours — near a wood stove or on top of a refrigerator can work well.
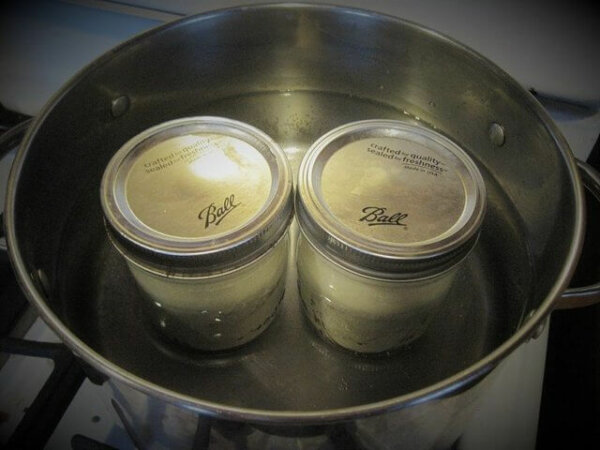
The longer you let it sit, the firmer and tangier it will become. With experience, you’ll know what you prefer.
7. Refrigerate And Enjoy!
Unopened jars can last for more than three weeks and opened jars last for about one week. If you want to flavor your yogurt, you can add those ingredients after the final culturing process.
Now, if you plan ahead and always reserve two tablespoons of yogurt, you can use it to culture your next batch. You’ll never have to buy yogurt again!
I know that some sources say starter yogurt is only good for three or four rounds of yogurt, but that is true only if you are using a lab-created starter (usually the kind found in DIY yogurt kits). If you acquire an heirloom starter like I was able to acquire from Seven Stars Yogurt, your well-cared-for yogurt should last indefinitely. Mine is six years old and still going strong!
Ways To Use Your Yogurt
While it is delicious with a drizzle of honey, granola, and fresh fruit, homemade yogurt is also versatile. I use it in place of sour cream in paprikash, instead of coconut milk in curry, and often substitute it whenever my baking calls for milk or buttermilk.
It makes a wonderful marinade for chicken when mixed with garlic, thyme, dill, fresh-ground cumin, hot pepper flakes, salt, and pepper. You can also thicken it into Greek-style yogurt by letting it strain through some cheesecloth overnight (save the whey for soaking beans!) or even turn it into a type of cheese called labneh.
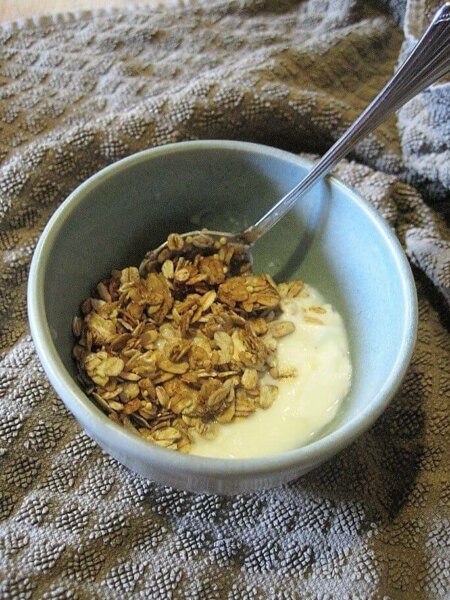
You can preserve yogurt cheese for the winter as tasty balls of shankleesh. Try making some spicy biryani, and balance the heat to perfection with a drizzle of yogurt-mint chutney. Blend it with frozen mango and a dash of ground cardamom for refreshing mango lassi. I could go on and on with all the wonderful ways to use real yogurt, but I hope that you also find some favorite dishes as this ingredient becomes a staple in your home.
This simple, easy recipe can help you reclaim yogurt’s rightful place as a homemade product in your kitchen. Rather than taxing your body with harsh, artificial additives, you can nurture your microbiome with living food.
Related Post: How To Make Flour
Additionally, if you have milk animals of your own, making yogurt is a great way to process and preserve all the milk they offer. Raw milk doesn’t last very long, and yogurt can preserve and enliven all that goodness for weeks.
Please let me know in the comments below if you try it! I’d be delighted to hear how it goes, and happy to offer any troubleshooting if needed.
Commercial Yogurt Ingredients (That You Might Want To Avoid)
Yogurt’s history is long and deep, spanning multiple cultures and regions where milch animals (the cow, sheep, goat, yak, etc.) were domesticated. Aside from being in the cuisines of immigrants, the majority of the U.S. population didn’t really use it in their diets — until the ’50s and ’60s declared it a health food.
Yogurt really became a common household food once some enterprising food manufacturers introduced sugary, fruity flavors to mask plain yogurt’s inherent sourness and make it appealing to the palate. Then they made billions.
Now the yogurt aisle is rife with ingredients that we try to keep out of our house and our bodies. If you read through the labels on some of the most popular mainstream brands, you will easily find concerning ingredients.
Fructose (Sweetener)
Fructose as an isolated ingredient that never occurs in nature and there’s evidence that it severely taxes the liver when consumed. Also, commercial fructose is commonly derived from sugar beets, sugar cane, or corn. This should be a red flag for those concerned about GMO ingredients, since it’s highly likely that any commercial sugar beets or corn are GMO.
Modified Corn Starch (Thickener)
I guarantee that this is from GMO corn. Also, the word “modified” is a tip-off that this corn starch is created through chemical or enzymatic means.
Kosher Gelatin (Thickener)
While this is a naturally-derived byproduct of the meat industry, I can’t imagine that it was from animals that were on a pasture and given the food they are designed to eat. More likely this byproduct is from feedlot animals. It is so easy to thicken yogurt naturally (see recipe above) that this ingredient is unnecessary.
Potassium Sorbate (Preservative)
Yogurt is a natural way to preserve milk for a time, so it is always odd to find preservatives in cultured foods. It is also interesting to note that when mixed with ascorbic acid (another common food additive often found in processed fruit or sodas), potassium sorbate can react and create a DNA-damaging toxin.
Malic Acid (Flavor Enhancer)
This is a naturally-occurring acid found in fruits like apples, and its sourness is often used to mask the weird tastes of artificial sweeteners.
Sucralose (Sweetener)
Sucralose is the generic name for Splenda. Lab tests have shown that one of its many side effects is harming the microbiome of your gut bacteria — which is totally a shame because real, probiotic-rich yogurt should have the opposite effect.
Acesulfame (Sweetener)
I’d never heard of this one before. Five minutes of research reveals this artificial sweetener might cause tumors and has been shown to inhibit brain activity ?. Getting a short kick of fakey-sweet that you have to mask with malic acid is not worth it.
Sodium Nitrate (Yet Another Preservative)
Known to increase cancer risk, particularly for colon cancer.
C’mon … Is Yogurt Really All That Bad?
Why attack yogurt when there’s much worse food out there? The truth is, I’m not here to demonize yogurt companies. They know how to make a product that people want to eat, and they’ve been successful.
There’s also a ton of brands of yogurt on the shelf, and some of them are probably much better than others, so we haven’t named brands here.
But knowing that any ingredient beyond milk and active cultures are unnecessary for making yogurt, I feel too many products in the yogurt cooler are designed to control your taste buds with sugars, weird preservatives, and artificial thickeners. Worst of all, they spend a lot of effort telling you that this thickened milk-goo is really good for you.
Related Post: Understanding GMO Foods
My stance on processed food is that once you start refining ingredients beyond their natural scope, there’s no real long-term benefit in using them. The good design of natural processes has been shattered and forced into shapes it’s not supposed to be. That’s why I think our natural bodies respond so negatively to these unnatural ingredients. We were never designed to process them! By contrast, simple, honest, natural processes should (and do) give us nutrition the way we are meant to have it.
This concern is obviously bigger than yogurt. To be frank, I’m using yogurt as a platform to talk about food in general and advocating that people take the time to read and understand ingredient lists. Whenever you don’t like what you see — especially if you don’t understand what you’re reading — it’s time to do the research and figure out what you are putting in your body for good health’s sake.















Leave a Reply