When you’re in the process of baking bread, proofing refers to the final rise after you shape your dough into loaves. It’s an important rest period before baking, also known as fermentation.
Fermentation is when the yeast is allowed to leaven the dough, and at times the words proof and fermentation and used interchangeably. Proofing bread is crucial to the overall flavor and texture of your final loaf. But let’s rewind a bit to learn more about bread making step by step.
Bread Making Overview
Baking bread is a process. You’ll need to set some time aside in your day as bread making takes time, and with a little bit of patience, you will have the aroma of freshly baked bread rolling out of your oven in no time.
Since bread proofing is an important step in a much larger process, I wanted to provide you with an overview of bread making. Check out our article on sourdough bread for a more complete, detailed how-to.
- Gather all the ingredients and equipment.
- Mix all of your ingredients creating a ball of dough.
- Let that dough ferment! This step is also known as the bulk proof.
- Next, you’ll punch the dough down, knead it, and shape it into loaves.
- Place the loaves into your baking pans and allow it to rise for the second time. This is also known as the final proof. This is where you get your bread structure and flavor.
- Once allowed to proof, your dough is ready for the oven and on it’s way to being a beautiful loaf of bread.
https://www.instagram.com/p/Be0oDPHn72H/?tagged=breadmaking
Now that I’ve given you an idea of where the bulk proof and the final proof takes place, you’ll have a better idea of where we are at in the overall bread making process when we start talking about bread proofing.
Bread Making Tools
Tools of the trade make the bread making process easier. The following is a list of equipment that can be helpful in your bread making journey.
- Thermometer: This tool can help gauge the temperature of your water while the yeast is activating and of the dough when it is in its initial rise. A thermometer is also handy when baking to ensure the center of your loaf is cooked all the way through.
- Scale: No need for measuring cups and spoons when you have a scale to measure out all of your ingredients. A scale will also give you a precisely sized loaf every time!
- Flour Sifter: Having one of these on hand helps when you have a recipe that calls for sifted flour, but it also prevents you from having to put your hand into the bag of flour when your hands are sticky with dough and you need to flour your work surface.
- Stainless Steel Scraper: From cubing butter to scraping off your workstation and dividing your dough, this is a tool that definitely comes in handy. Simply put, it’s for scraping every last bit of doughy goodness from your bowl.
- Proofing Baskets: These add to the visual appearance of your final loaf, creating a professional (and Insta-worthy) look every time. They also are known to help the crust get crispier and produce a beautiful color.
- Loaf pans: Great for making a sandwich-type loaf.
- Silicone mat: These mats will fit right into your flat pans and keep your baking from sticking to the pan. Finally! No need for parchment!
- Pizza stone: Great at retaining heat, these stones are great for pizza but also for making bread. Pizza stones will create a perfectly crusty loaf.
Bulk Fermentation: The First Dough Rise
Bulk fermentation, or the first rise of the dough in bread making, is a very important step in the breadmaking process because this is where we let our dough ferment before dividing and shaping it into loaves. It is during this fermentation process that the yeast is going to work its magic.
https://www.instagram.com/p/BetRv6JgHcT/?tagged=bulkfermentation
The process of fermenting helps the dough gain flavor as the yeast is creating alcohol and other by-products. The carbon dioxide it creates will inflate the gluten, which in turn will help the dough’s structure.
You do not want to rush your bulk fermentation as this is where all the yummy flavor is produced!
Don’t Rush The Process
If you allow the dough to rise too quickly, you will get a lot of carbon dioxide but less alcohol, and this will make the bread have an off flavor. The alcohols released by yeast give bread its tasty, rich, earthy flavor, but if the dough is allowed to rise for too long, that flavor will become pronounced and the bread will have a heavy yeasty taste or smell.
https://www.instagram.com/p/BTra3u-lao5/?tagged=bulkfermentation
Proofing the dough too fast will also interfere with the gluten structure as the yeast will over-inflate and pop, resulting in a dense or more flattened bread.
Consider A Slower Process
However, you can slow down the bulk rise and this will encourage more flavor and structure. But remember that the yeast only has so much food supply, and there needs to be some sugar to allow the crust to caramelize when you bake the bread.
At lower temperatures, the dough will develop a more pronounced flavor, but it will take longer to rise. Alternatively, warmer temperatures allow the dough to rise faster, which can be a huge time saver. So, it’s really a matter of what you care about more – flavor or efficiency.
https://www.instagram.com/p/BdYW4a6BwVF/?tagged=bulkrise
It’s even possible to leaven dough overnight, though it needs to be left in the refrigerator to stop the dough from over-fermentation. An overnight proof will often have a stronger, more yeasty flavor.
The benefit of allowing dough to rise twice with the bulk proof and then again with the final proof produces a finer gluten structure than allowing it to just rise once. It will also prevent huge gaping air holes in your bread.
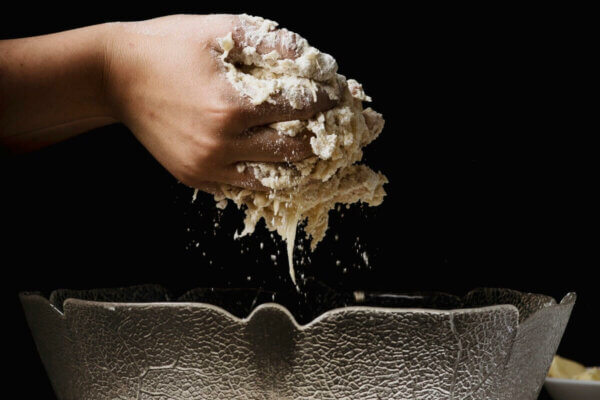
When you take your bulk proof and knead it, you push all the air out, and this is what helps develop the gluten structure.
What Happens With Too Much Or Too Little Proofing?
For comparison, a dough that has not been proofed for enough time will have a gummy-like texture, as it did not have enough time to ferment.
https://www.instagram.com/p/BSqtW9tjKbX/?tagged=overproofing
Alternatively, a dough that has been proofed for too long will become very crispy and dry as the fermentation process allowed for moisture loss as the yeast fed too much off the ingredients.
Tips For The Perfect Proof
Since fermentation is related to the flavor of the dough and can only happen during the proofing stage, mastering your own proofing technique will create your own unique product!
https://www.instagram.com/p/BeB8CRSHxGe/?tagged=breadproofing
The longer the proofing time, the more distinctive the texture becomes, but remember, the yeast only has so much food, so you will want to ensure you don’t overproof your dough.
A good rule of thumb for the bulk rise is 2 to 2 1/2 hours, but even in a cool location no longer than 3 hours, otherwise the taste and structure will be compromised.
Final Proof
In your final proof, the loaves will go through their final stage of fermentation; during this time, the loaves should nearly double in size.
If you proof your loaves in the fridge, this will slow down the final rise, giving the loaves more flavor. This process also makes the loaves easier to handle and score before baking.
https://www.instagram.com/p/BcwUuT_lEv4/?tagged=finalproof
There aren’t many specifics when it comes to proofing, just guidelines because times and temperatures depend on things like the amount of each ingredient and the desired end product.
The ingredients in the recipe are directly related to the end result, so it’s crucial to be consistent when reproducing a recipe as variations to the recipe can change the flavor and structure of the bread.
https://www.instagram.com/p/Bea4F1wlsAH/?tagged=bulkfermentation
If you want to achieve a consistent bread, you must first have a consistent recipe or formula based on proofing tests that you have done. It may take some time to master, but you will end up with a bread suited to your own tastes.
The following bread recipe is one that my family has been making for years. It’s adapted from my favorite bread book, “World of Breads” by Dolores Casella.
Easy Buttermilk Bread
Ingredients
- 1 cup buttermilk
- ¼ cup sugar
- 2 ½ teaspoons salt
- ⅓ cup butter
- 1 cup warm water
- 2 ounces cake yeast or 2 ¼ teaspoons dry yeast
- ½ teaspoons baking soda
- 6 cups sifted flour
Directions
- Warm the buttermilk on the stovetop until it’s hot enough to melt the butter.
- Stir in the sugar, salt, and butter and let cool.
- Dissolve the yeast in the water and add to the cooled milk mixture.
- Combine the baking soda and half of the flour. Add to the yeast mixture and beat until smooth.
- Stir in the rest of the flour and turn out onto a floured board. Knead until smooth and elastic.
- Place in a greased bowl, cover, and let rise until doubled. This is your first bulk proof.
- Once doubled, punch dough down and turn out onto the board once again.
- Split the dough in half and shape your loaves.
- Place each loaf into a well-greased, 8-inch loaf pan.
- Brush tops with melted butter and let rise again. This is your final proof. Remember that allowing this to rise in the refrigerator will take longer but will create a stronger tasting bread.
- Bake in 400-degree Fahrenheit oven for 50 minutes.
- Allow the bread to cool and enjoy!
A Variation Of This Bread
Instead of shaping into loaves, roll out the dough and spread with butter, then sprinkle with 1 ½ cups of chopped, sauteed onions and 1 ½ cups of grated sharp cheddar cheese.
Roll up as you would a jelly roll. Cut in half, place into 8-inch loaf pans. Allow them to proof and bake in 400-degree oven for 50 minutes.
Bread Proofing On Instagram
Error: Access Token for insteading is not valid or has expired. Feed will not update.
There's an issue with the Instagram Access Token that you are using. Please obtain a new Access Token on the plugin's Settings page.
Error: No posts found.
Make sure this account has posts available on instagram.com.





















Leave a Reply