Catching rain water from your roof and using it in the garden is easy and green.
This project will help reduce storm water run off and provide water in spots that your hose might not reach. Rain barrels are inexpensive to make and only take a few hours to build.
Tools needed are: basic hand tools, drill with key hole bits, snips for cutting screen, and plumbers tape.
Supplies needed are a rain barrel (any clean plastic, food-grade barrel will do), fine mesh window screen, bolts (with nuts and large washers), brass tap, spigot adapter, and epoxy glue or caulk.
1. Find or make a flat spot under a down spout. Once the barrel is full, you won’t be able to move it. Remember to put it up high enough to easily put a watering can or attach a hose to the bottom. Raising it up on cinder blocks or a sturdy bench work well.
Related Post: Best Garden Hose
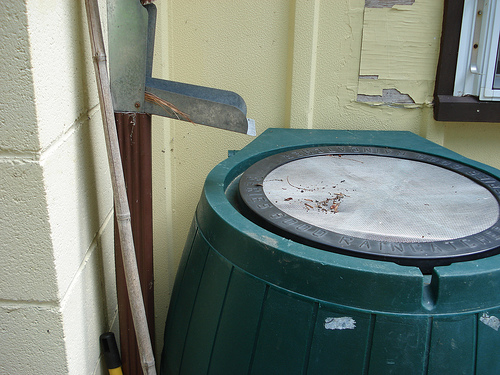
Most food-grade barrels will come with two holes in the top. Take out the plastic plugs. Position the empty rain barrel so that down spout drains into one of the two holes. Now is the time to move things around or add an elbow to the down spout so it can reach.
2. Now that you have a clear plan for positioning the barrel, take it to your workspace and drill out a hole for the brass tap. Use and adapter if you need to – this is a pvc plug with threads to accept the brass tap. Some barrels already come with a hole on the bottom or lower edge. Using plumbers tape, seal the tap into the hole. If the hole isn’t quite perfect, use caulking to seal it well. It is important to seal this hole well since there will be a lot of water behind it and you will be moving it every time you open the tap.
3. Whether you are using the existing holes on top or make your own, you will need to cover them with screen. There are two ways to go from here. One way is to lead the drain pipe right over the hole and insert a pvc reducer into the hole so the large opening can accept the water. If you do this, you will need to cover the large opening with fine screen and attach it with a pipe clamp or glue. A second method is a bit quicker. You can just put screen over the hole with glue or bolts with washers and position the down spout more or less over the screened opening. This method works well if your barrel a bit unsteady or you live in areas with heavy down pours. Heavy down pours will result in more splashing and debris that can clog a smaller opening.
4. Now about that second hole, you are wondering! The second hole needs to be covered with screen. This is your overflow. Cover it with the screen and either bolt it down or glue it.
5. Now you need to let the caulk and glue dry. If you haven’t used either, or you’ve let them both dry over night, you can add some water. A gallon or two should be enough to see if your barrel works.
Rain barrels are a great way to deal with drought, but can also be a solution for a garden without traditional access.
Image Credit: Flickr – fireballsedai














Leave a Reply