
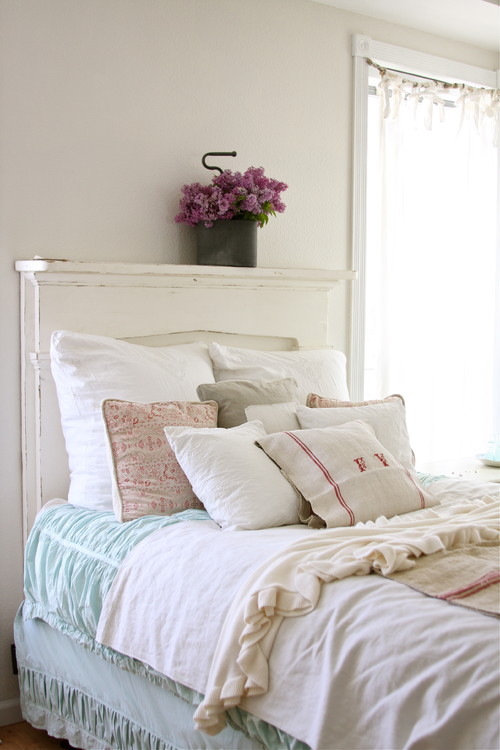
Your bed is your second home—a place where you’ll spend one-third of your life dreaming up your next DIY project. The bed is your safety zone, a lovers’ sanctuary, a creative child’s train, boat, or horse-drawn chariot.
Yet, a bed is also just a soft and characterless loaf in need of textiles and furnishings to make it unique.
In other words, it’s what we put on it, or around it, that gives a bed its character. The foundation of where our bed’s uniqueness starts is the frame and at the helm of the frame, is the headboard.

The headboard captains our soft rectangular dreamboats and acts as a maritime flag while we sail on the seas of dreamland. Just like every ship has a name, why not every bed?
Building a headboard is as easy as sewing a flag—and in terms of my sewing skills, a whole lot easier—especially when you realize that a headboard doesn’t have to connect to your bedframe. In fact, you don’t even need a bedframe at all to have a headboard!
Required Tools
- Screw gun
- Driver bits (for screws)
- Drill bits (for predrilling holes in wood and/or metal)
- Wood screws
- Circular saw
- Levels
- Stud finder
- Sander and sand paper
Materials
- Screws (3 – 3 1/2 inches Torx-drive)
- 2X4 or 1X4 for your posts
- Sheathing plywood (1/2-inch thickness or under)
- Your headboard material (pallet timber, fencing cedar, old doors, new lumber, etc.)
- Nails
- Wood glue
Design Basics
For the sake of this article we’ll be relying on a basic construction method to construct the headboard, and affix it to your wall.
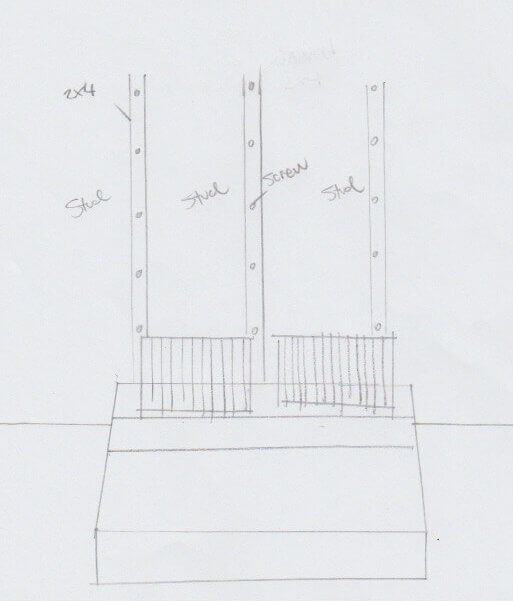
Posts—The Frame Of Your Headboard
To better envision how your headboard will be constructed think of it as a large square/rectangular sign with two posts, like the kind you’d see standing out of the ground alongside the highway, or at a construction zone.
- These posts will roughly distinguish the perimeter edges of your headboard and the material you use, since your headboard will be screwed and/or glued onto them.
- The height of these posts will distinguish the height of your headboard.
- These posts in turn will be anchored to your wall.
Attaching Posts To The Wall
For this design, your posts will be attached to the wall first. Once you have decided the desired width of your headboard you’ll want to find every stud behind the wall that will be covered by the headboard.
Use your stud finder and locate the center of each stud. A great way to make marks and lines on the wall without damaging the paint is to mask first with blue tape and draw on the tape.
I’d go with at least three posts if not four to make sure that your headboard is property anchored and not bowing out in the middle.
From here, work out how many linear feet of post you will need and go get them at your local lumber yard. Cut your posts at the lengths you desire, making sure that they are equal.
Pro Tip: If you don’t have a circular or chop saw handy, many lumber yards will cut for you, especially if it’s just a small order.
Once your studs are established you can put up your posts. I’d go ahead and use 2X4s, which will bump out 1.5 inches when affixed flat to your wall. However, you can also use 1X4 lumber to decrease the reveal of your headboard from your wall.
The great part about screwing into studs is that you don’t have to use mollies!
However, you still should be precise about what you’re doing. Start with an outermost post and hoist it to your desired height. You want your post slightly loose so you can plumb it, or in other words make sure it’s perfectly straight up and down.
Center the top of your post with the center of your stud and drive your screw into the stud until the head of the screw just touches the surface of your post. Use your level and put it lengthwise against the post and swing it until the bubble reads that the post in perfectly plumb.
Go eighteen inches down your post and put in another screw. At this point you can go back and drive the top screw home, and then work your way down the post continuing as you go to check that the post stays plumb. 2X4s are rarely perfectly straight, so it may take some slight pushing and pulling.
Do the same with your second outermost post making sure that the tops of your posts are level across. Add your center post(s).
NOTE: Your posts will be hidden from view once your headboard is completed so don’t worry if they don’t perfectly align with the edges of your bed.
Once your posts are up, you’re ready for the creative part!
Time To Get Creative
You’ve gotten to this point, and survived the boring parts about screws and posts and whatnot. Now it’s time to get creative!
There are two main strategies when constructing your headboard.
The first is nailing, screwing, or gluing your material directly onto your posts. If you’re using any sort of slat material, this is a good option. Here is an example for using cross slats.
When it comes to preparing your slats, there are a million and one things you can do. You can buy new planks, sand and paint or stain them yourself for a new and polished look. Or, you can go rustic.
The rustic look can be made easy if you happen to stumble upon a stack of abandoned pallets, or find the perfect old door amongst the stacks at an architectural salvage store, but many times it takes some added encouragement to get your reclaimed wood looking good.
Apply a thin coat of white paint (or any other color you wish) to your used material and then lightly sand it off for a distressed worn paint look. or consider torching your wood for a unique charred finish. Sometimes, naturally weathered wood is all you need—no work necessary!
You’re your own boss here so try out your ideas and see what happens!
Fastening Your Material To The Posts
When your material is cut to the desired length and ready to put up consider what kind of fastener will work best.
For cleaner and more polished designs I’d go for a thin finish nail that will be hard to spot and can easily be filled if you wish to hide the nail head. I’d also use a little wood glue for added strength.
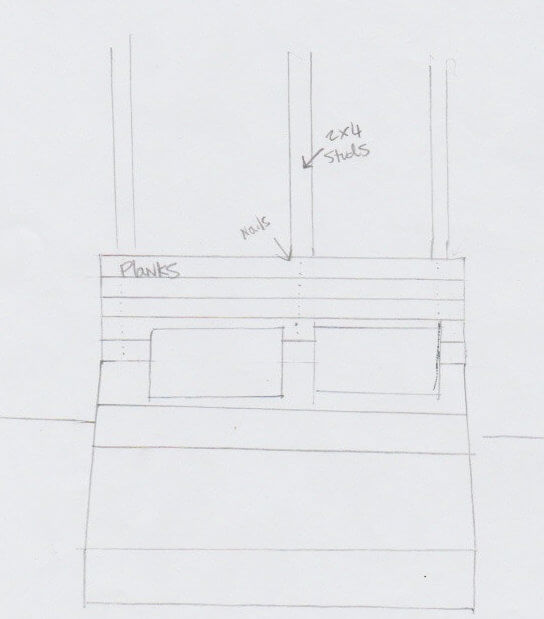
If you’ve gone with the distressed look, wider nail heads will be your best bet. Keep in mind that your nails don’t need to be exorbitantly long as they just need to go through the slat and into the post. Another option is 18 gauge staples if you have the gun handy to use them.
Use your level to make sure that each slat is level. To do this nail one corner of your material to an outer post, set your level on top of the slat, and then maneuver the other side of your slat until you come level, and then nail away.
Pro tip: If you want your slats to abut tightly together and limit the visible space between the seams, run both sides of your timber through a table saw to ensure the straightest lines possible.
Another option is using a backer board. Using a thin piece of sheathing plywood (less than half an inch) can expand your creative options and potential. With a backing board, you can use smaller pieces of wood or you can go for a vertical slat design. Either way, you can limit the visible space between your slats by painting the backer board black, or the same color as your wall.

Use a circular saw and measure your sheathing plywood, subtracting at least 2-3 inches on all sides from the dimensions of your final project. This is because you don’t want to be able to see the edges of the plywood when viewing your headboard from the side.
With the backer board, you can utilize glue on smaller pieces, and even design and build your headboard on the ground, and then hang it onto your posts when it’s finished. It’s up to you, but make sure that all your materials are securely fastened.
A Few Extra Touches
Think about adding lighting behind your headboard. It’s not for everyone or every design, but can be a great added feature to some designs.
https://www.instagram.com/p/BU6t1w1BOmv/
The beauty of using posts to secure your headboard material to is that you’ll have the space to run lighting wire between your posts, and on the inside edges, plenty of space and backing to secure lights to. Get creative and find what works for you.


Leave a Reply