It may be difficult to find something to do with debris from a storm, but this simple project for creating art out of pine branches can help.
Recently, a wet and blustery storm swept across the landscape near my home. The result of all this commotion led to a wet dog, several branches laden on the ground, and more kindling than I was willing to load for a cooler season. Looking across the debris, I realized that several of the pine branches were fairly large. Pine cannot be used as kindling because it burns too quickly, but it is useful for woodworking projects.
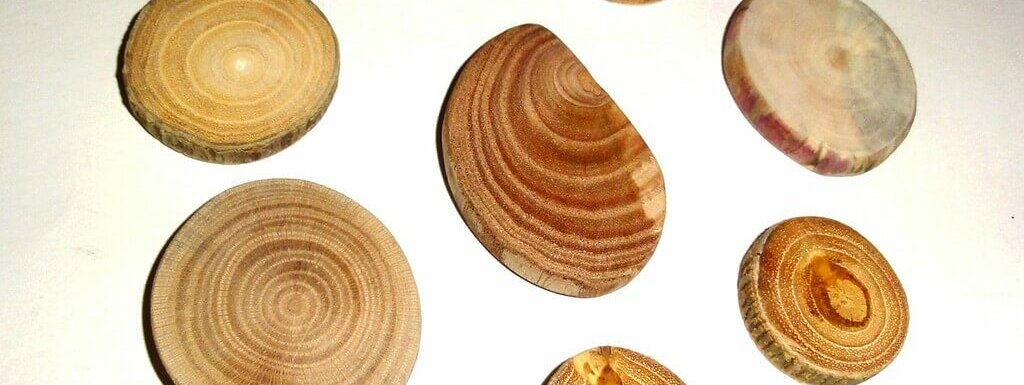
Viewing the excess of branches, I decided to embark upon a little project making small, wooden magnets. The major component of this project are slices cut from a seasoned (or dried) branch. The small slices are called “tree cookies,” and can be used to decorate your refrigerator, or given to friends as gifts. This little project is simple and does not take a long time, making it easy for even the most novice of woodworkers.
So why wooden magnets you may ask? Well, because each tree cookie has a personalized design placed on the front side, making it perfect for both home decor and giving away as gifts for loved ones! This design can be done by yourself, or with little ones who want to join in on the fun. These mini-plaques are a great way to personalize your home and make memories.
Materials
- Glue, any brand will do
- Handsaw
- Magnets
- Permanent markers
- Pliers
- Seasoned branch, never use freshly cut branches because they will attract mold by not drying properly
- Sandpaper, between 200-400 grit
- Wood burner, for example, a wood burning pen kit with interchangeable tips for a variety of lines
Note: You can also buy full kits on Etsy (T.S. Shure Woodburning Creations Kit, Detailer Kit, Deluxe Woodburning Kit Pyrography Craft, and Classic Wood-burning Kit) or Amazon (T.S. Shure Woodburning Creations Kit, Deluxe or Creative Woodburning Kit, and NSI Wood Burning Kit).
Preparation
- Using your handsaw, cut 1 to 2-inch-thick slices (cookies) from a seasoned branch. Be mindful of where you keep your hand as you slice the branch, cutting the wood and not your fingers. To create a rustic look, keep the outer bark on each cookie.
Note: The cookies can be cut out of the branch at any angle. How you cut the wood will determine if the cookie is oval or round in shape. No need to aim for perfection here, just have fun! - Once you have cut your cookies, lay each cookie flat on a surface.
Dendrochronology: The Science Of Tree Aging
The flat area of the tree cookie is called the “cross section”. You will notice that each cookie has circles in the cross section. These circles are called “annual rings.” An annual ring is created for each year a tree grows, and this is one technique that scientists use to “age” a tree. Roughly one year of growth is represented by a ring consisting of an inner light section and an outer dark section.
https://www.instagram.com/p/BWDbprEjyYP/?tagged=woodburn&hl=en
To find out how old your tree was, you will need to count the annual growth rings on your tree cookie. Starting in the center of the cookie with the smallest circle, count the rings in an outward fashion. The resulting number is an approximation of how old the tree was when the branch fell. You may notice some of the rings are thicker than others.
The space between each dark circle provides information on how wet or dry the year has been within the specific ring (year) of the cookie. Scientists can use the width of the tree rings, in trees that need rainfall, to determine whether there were large amounts of rain in a specific year. The general rule is more rainfall occurs in years with thicker rings.
Step-By-Step Instructions
Step 1: Sanding
First, you will need to lightly sand the cross section of your cookie. The bark on your cookie does not need to be sanded. Sanding the cross section is important because it will help the image to appear sharper after wood burning.
Once you have completed sanding all of your cookies, wipe the surface with a damp towel to remove all of the sawdust.
Step 2: Design Your Cookie
There are two ways to design how your cookie will look, both of which are listed below with instructions.
Free-hand
- Using a pencil, draw the design directly onto the cookie. You can use another writing utensil, but pencil is the easiest to hide with wood burning.
Transfer A Design
- Make or print out a sketch of the image you would like to use.
- Heavily outline the sketch using a pencil.
- Place the sketch, pencil-marked side down, onto the cookie.
- Using tape, or your hands, hold the sketch in place.
- Trace over the sketch with medium pressure to transfer your design onto the cookie.
- Remove the paper from the tree cookie, making sure the design has transferred. If the design hasn’t transferred, you may need to repeat step 2 or press down harder in step 5.
https://www.instagram.com/p/8CJPeMSg0N/?tagged=sketchonwood&hl=en
Step 3: Wood Burning The Design
With your wood burning pen, lightly follow the pencil marks on your cookie. Use caution, many beginners make the initial mistake of pressing down too hard with their wood burning pen. I did this my first time and it left unnecessary holes and errors in the design.
Remember to take your time! Wood burning is a slow process and rushing will only result in mistakes. As you familiarize yourself with the pen, use steady pressure for consistency. Notice that the longer you hold your pen in one area, the darker and more depth the line will have. For more tips on wood-burning, this video explains how to use a wood burning pen for different lines at 2:50 minutes.
Once you are done burning the wood, fill in the outline of your design with permanent markers. Again, apply light pressure as you fill in the design. Any moisture that hits the grain of the wood will spread, meaning that the markers can easily “bleed” beyond the outline.
Wood-burning Safety
Handle your wood burning pen with care, it will become hot quickly. Remember to use the wood burning pen holder that came in the kit, this can prevent you from burning other items on accident (including yourself). It is also important to always use metal pliers to attach and detach the tips of your wood burning pen.
Step 4: Final Touches
The next step is to glue a magnet onto the back of your completed cookie. There isn’t necessarily a perfect type of glue to use in this step, considering that I have used several types of glue from my kitchen junk drawer. White glue, super glue, and yellow carpenter’s glue have all worked in my experience.
Let the cookie sit overnight after you have applied the magnet with glue. In the morning, feel free to make any finishing touches to your cookie.
https://www.instagram.com/p/BRpH_umF0Mj/
These cookies are a wonderful way to show off treasured report cards on the fridge or to share among friends.
The possibilities are endless!


























Leave a Reply