Do you love sausage but get tired of the limited options your grocery store sells? Making your own sausages gives you control over the quality of the ingredients, the spice mix, the link size, and any allergens.
The flavor of fresh, homemade sausages is completely unique, and the process of making it yourself gives you a sense of accomplishment and connection to your food.
https://www.instagram.com/p/BeHMynLnBSQ/?tagged=homemadesausage
Parts of the process are great to do with children, and engaging kids in making food from scratch is a useful way to interest picky eaters. The best thing about sausage is it goes well with breakfast, lunch, or dinner!
While sausage making is a lifetime craft, it is surprisingly easy to get started. In this article, we’ll look at some of the basic tools and techniques to make you feel confident following any sausage recipe.
Sausage Making Equipment
Before you begin, gather your equipment. For basic sausage making, you will need a meat grinder and if you’re wanting to make links, a sausage stuffer. If you have a stand mixer, they do offer meat grinder attachments. Otherwise, there are plenty of awesome stand-alone options on Amazon.
There are some DIY approaches to sausage stuffing involving film canisters and plastic bags, but those approaches are going to be messy, frustrating, and a waste of time. There are stand-mixer attachments for sausage stuffing that cost less than $15, or you can buy an affordable stand-alone stuffer, which allows you to do larger batches with even less hassle.
https://www.instagram.com/p/BeG_JULHLds/?tagged=sausagemaking
You will also need measuring cups and several large bowls or pots that are big enough to mix the whole batch of sausage you are making.
Meat Options
The most important component of delicious sausage is the meat. Not just the type of animal, but how it was raised and what it ate. While hotdogs famously include “everything but the hooves,” good quality, tasty sausages are made of quality meat.
The higher the quality of the meat, the better the flavor and health benefits for your family. Fats from animals raised outdoors and on a pasture have higher levels of antioxidants, omega-3s, and fat-soluble vitamins like A and E. No matter what your ingredients are, the quality of your sourcing will increase the quality of your final product.
https://www.instagram.com/p/BewpGJunhPz/?taken-by=fortheloveofcookbooks
Sausages can be made from just about any type of meat. Of course, we’re all used to pork, beef, lamb, chicken, and turkey sausage, and anyone with a hunter in their family has had venison sausage.
However, you can also make sausage out of rabbit, goat, fish, shellfish, and even frog! Keep in mind that not all meats can be interchanged in recipes. While chicken could be substituted for rabbit, it could not be substituted for pork without changing the other liquid and fat ingredients.
This is due to the fact that the texture of the finished sausage is the result of a finely balanced combination of meat, fat, liquid, and emulsifiers like egg.
Fat Ratios
The most important element that affects the texture and juiciness of your sausages is the fat to lean ratio of your meat. For making firm sausages like bratwurst, breakfast sausage, chorizo, hot dogs, and kielbasa a fat to meat ratio of about 80 percent lean meat to 20 percent fat is typically used.
There are other types of sausage that are smooth and soft, including recipes like blood sausage that have higher levels of fat and liquids like water and milk. They are also handled slightly differently during the mixing stage.
https://www.instagram.com/p/Bej3RMjFfst/?tagged=sausagemaking
Fat is unevenly distributed over an animal’s body. On pigs and cows, who have different levels of fat but similar body distribution, the front shoulders are marbled, an excellent texture for making sausage.
Alternatively, the rear quarters are very lean and need added fat. The bellies have a high-fat ratio, too fatty to use alone in sausage. The fat ratio changes depending on the age of the animal and what they were fed.
The species of animal makes a big difference in the lean to fat ratio and the flavor of the sausage. Pork is the classic sausage ingredient because it has an ideal fat ratio for firm sausages, and often pork or pork fat will be mixed with lean lamb or other meat.
Sausage from very lean animals like chicken, elk, or venison would be unpleasantly dry without added fat of some kind. Often pork lard will be added, but beef tallow, eggs, or heavy whipping cream can also be used.
Grinding and Mixing
Temperature is key in sausage making, particularly in the grinding and mixing process. Meat and fat that’s ground for sausage should be partially frozen, really as frozen as possible without being too stiff to grind.
This ensures that the meat grinds into more solid junks, rather than smearing or mushing, and gives the resulting sausages a firmer, more desirable texture. Being partially frozen also makes the meat easier to handle and cut.
https://www.instagram.com/p/BCESXFZRzre/?tagged=sausagegrinder
Fat should also be frozen, as it will be even more difficult to work with as soon as it starts to melt, and the ground fat should be chunky enough to mix with the lean meat without smearing.
Cutting the Meat for Grinding
Take partially frozen pieces of meat and fat and cut them into strips small enough to fit in your grinder. For a typical stand mixer attachment grinder, this means no more than about an inch and a half thick in each direction and five or six inches long.
Soft meat like fish should be diced fine with a knife rather than ground and handled delicately throughout the process.
Make sure to trim out any tough sinew, bone fragments, or other inedible bits. Put the meat in the refrigerator when you are not working on it or back in the freezer briefly if it is getting soft. Don’t forget it though, or all those strips will freeze together and you will have to wait for it to thaw again! If you are using metal grinder attachments, put those in the refrigerator before you begin work.
Operating Your Meat Grinder
Follow the instructions on your meat grinder to grind all the meat. Be careful of your fingers and use an implement like the handle of a wooden spoon to press the meat into the grinder.
It doesn’t really matter if you grind the lean and fat separately or if you mix them together as you grind. You’ll be mixing everything thoroughly when you incorporate the spices anyway.
https://www.instagram.com/p/Bao0vPvH_Ax/?tagged=sausagemaking
If the meat begins to get mushy and it stops coming out of the grinder in distinct ribbons, stop and check the temperature and your apparatus. Take the grinder attachment apart and check the cutting blade and the auger.
Often a piece of sinew will get tangled around one of these pieces, which reduces the efficiency and quality of your grind. Clean the grinder and resume.
Mixing Your Ground Sausage
When you are ready to mix your sausages, you’ll first need to combine your spices and wet ingredients. Mix them thoroughly in a separate bowl from the meat. Mixing the spices with water puts them in suspension and allows an even distribution throughout the ground meat.
https://www.instagram.com/p/Baaq0hHHu24/?tagged=sausagemaking
The water needs to be cold for food safety and textural purposes. Most recipes call for ice water as a liquid, but if you are using other liquids like ale, fruit juice, or vinegar, those liquids should be chilled also.
Combine the meat and spices and mix with your hands, using steady, rolling motions like you’d use for kneading bread. This should be done quickly to prevent heating the meat, but keep in mind not to rush it, as it’s a very important step for the texture of the sausages.
https://www.instagram.com/p/BcgqgMkHKvd/?tagged=sausagemaking
Just like kneading bread, this process changes the cellular alignment of the meat, creating a mixture that will hold together and absorb fat and water, making juicy sausages.
Overmixing not only warms the meat but also breaks down the structure holding the juices, causing drier sausages. You’re done kneading when the water in the spice slurry has been fully incorporated into the meat and a small gob of the meat mixture will stick to your palm for at least five seconds when you turn your hand upside down. The sticky mixture at this stage is called the farce, derived from the French farcir, to stuff. It essentially refers to the seasoned mix of meat and spices, ready to be linked
Choosing Spices
Although spice quality makes a difference in the overall flavor of the sausages, I would say that it doesn’t make nearly as significant a difference as the meat quality.
Sausage recipes typically call for dried herbs because the powdered consistency is easier to mix and the flavor is more consistent. Fresh herbs can be substituted if washed and finely chopped, but they will give a different overall flavor.
https://www.instagram.com/p/Bex0NqGgoWr/?tagged=sausagemaking
Some recipes, like this classic bratwurst, call for eggs, milk, or fruit juice as binding agents or emulsifiers. Depending on the type and texture of meat, recipes may also call for a starch like breadcrumbs or rice, especially for flaky, soft meat like fish or for liquids like blood sausage.
You can experiment with these components to accommodate allergies or dietary restrictions, but you will find it causes textural variation. A better bet than trying to do your own substitutions is just to find a recipe that uses an alternative.
Spice mixes, on the other hand, can be altered without any effect on the texture of the overall product, just the flavor. By all means, leave out the coriander. Interested in that ginger pear recipe, but want to substitute allspice for nutmeg? Go for it. My only advice is to make a test batch first.
Stick to the Recipes – Unless You’re an Expert
The first few times you make sausage, start with a recipe.
Sausage recipes don’t seem to be something passed down in families unless your great-grandparents have a recipe from before home-making sausages went out of style at the turn of the century. However, there are plenty of great recipes online, and you can check out cookbooks with sausage recipes from the library.
https://www.instagram.com/p/Bev_34WhZko/?tagged=homemadesausage
Even if you’re working from a recipe and not making changes, it is always a good idea to do test batches with small portions of farce. At any point in the spice mixing process, you can fry up a small meatball or miniature patty to taste test.
It’s a good idea to do this at least once before finalizing your recipe in order to check on saltiness, spiciness, flavor balance, and so on. And make sure to keep track of the things you try!
My biggest downfall as an inventive chef is an inability to record what I’m doing. I’m constantly creating delicious meals that I can’t reproduce because I don’t remember the ratios or combinations of spices I used.
In many ways, sausage making is like baking – flexible and versatile for pros, but a solid recipe is absolutely crucial for beginners. Keep track of the recipes you try.
Stuffing and Casing
Once you’ve taste tested your final mixture, you can go ahead and fry up patties and meatballs without worrying about linking. This is a great option for beginners who don’t want to invest in the special equipment required for sausage stuffing.
However, sausage casings exist for a reason – they hold fat and moisture in the meat as they cook so that you can smoke sausages and they will still turn out juicy and delicious instead of dry.
https://www.instagram.com/p/Bciic3sF-9o/?tagged=sausagemaking
If you do want to stuff and link sausages, it’s a straightforward process but requires a little extra preparation.
There are two basic options: synthetic casings made from collagen produced as a byproduct of rendering skin and natural casings. Natural casings are intestines with the internal membrane of filli stripped off in a special process.
Synthetic Casings
Synthetic casings are cheaper and have a slightly different consistency. I actually find them somewhat more pleasant to eat than natural casings, which can have a somewhat slimy or gummy texture even when cooked.
They are also uniform in size and thickness and are ready to use directly out of the package.
Natural Casings
Natural casings can have a lot of variation in the thickness of the membrane and the size of the casing, which changes how large you can stuff them and requires some adaptability. An understuffed sausage won’t hold its juices as well and will have a looser texture, while an overstuffed sausage will burst.
Typically sausages are stuffed in hog casings, while small sausages like miniature breakfast links are stuffed in lamb casings, and large sausages like summer sausage are in beef casings.
https://www.instagram.com/p/BPh90bODQ6u/?tagged=naturalcasing
Natural casings are bought dried and packed in salt and have to be rehydrated and rinsed before use. Only rehydrate as many as you are going to use, and the rest will continue to store, salted in the refrigerator, for up to a year. However, if you do rehydrate too many, just pat them dry with paper towels and liberally salt with kosher pickling salt.
When rehydrating, put the casings in a bowl of cold water for 12 to 24 hours, changing the water at least once to wash off the salt. When you are ready to link, rinse the casings in cold running water.
The Process of Stuffing
Assemble your sausage stuffer, whether that means putting an attachment on your stand mixer or putting a separate sausage stuffer together, following the instructions included with the machine.
Mid-sized, free-standing sausage stuffers are hand-cranked, rather than electric, and are designed to be bolted or clamped to a table top, so you don’t have to stabilize the apparatus while you work. Sausage stuffers are designed for one person to operate, but the first time you do it, an extra set of hands can be helpful.
https://www.instagram.com/p/Be3yMmelB-U/?tagged=sausagestuffing
Whether you are using a stand mixer or an independent stuffer, the mechanism is the same – a compression chamber for the farce, attached to a nozzle, where the farce comes out into the casing.
The empty casing goes on the nozzle before you begin, scrunched all the way to the base. It should be crumpled, not rolled, so that it unfurls smoothly. Put the farce in the body of the stuffer or into the input on the stand mixer.
The goal is to stuff the casings full but not bursting, without getting air pockets, and to achieve a consistent thickness of sausage throughout. There’s a significant learning curve, so don’t worry about perfection on the first try. The sausages will taste great regardless.
https://www.instagram.com/p/BR8QAmnBe6y/?tagged=makingsausage
Begin to crank the stuffer or turn on the stand mixer so that the farce fills the nozzle, before pulling the casing over the end of the nozzle and twisting it to close the end. There is no need to knot it – the twists allow for some flexibility and help prevent tearing.
Using one hand to guide the stuffed sausage and the other to turn the crank on the stuffer or feed farce into the mixer, continue slowly and steadily until the whole casing is full. Leave three or four inches at the other end empty and slide the last of the casing off the nozzle. Now you have a sausage coil!
Linking
Coils can be cooked and served whole, but most people link sausages. Start from the twisted closed end, not the open end, measure off however long you want your sausage to be, and pinch the meat out of the way. You can also use your fingers to even out the thickness and farce distribution inside the casing if you have ended up with a lumpy coil. Next, twist the sausage away from you four to seven times.
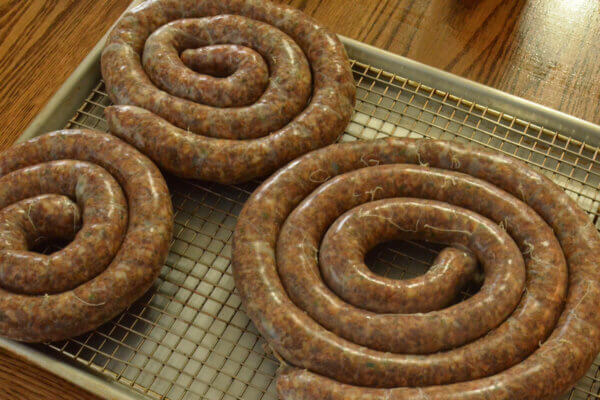
Move down the coil, pinch the meat, but instead of twisting away from you, twist toward you. Continue repeating, alternating the direction you twist each new sausage. If you twist each sausage in the same direction, the previous twists will unwind. This is another stage where it can be helpful to have more than one set of hands helping if you are new to sausage making.
Casings sometimes split during linking, especially natural casings. Don’t worry, just twist the sausage coil closed on either side of the split, making two separate coils.
https://www.instagram.com/p/BKUFzFWhduT/?tagged=sausagelinking
To do this, you will have to remove some farce to make space. Just put it back into the stuffer to be incorporated in the next coil. The number of coils you get per pound of meat depends on the diameter of the casing.
When you have finished linking, put the linked coil in the refrigerator for several hours to allow the farce to rest.
A Note on Food Safety and Handling
There are just a few basic things to keep in mind when handling meat in order to stay safe. Meat should never be allowed to come into the “danger zone” temperature range, between 40 and 140 degrees Fahrenheit, where bacteria grows, for more than four hours.
Put meat in the fridge or freezer when you are between steps or working with a different batch of meat. You can use a meat thermometer that registers low temperatures to check the temp at any time.
Keep your knives sharp. Sharper knives are safer because you use less force while cutting, and it’s also less tiring.
https://www.instagram.com/p/BdfutGhA3_J/?taken-by=nurdianpustiadi
Wash all your surfaces with soap and hot water. When working with raw meat, be aware of what tools and surfaces have touched the meat, including meat packaging. Since sausage making doesn’t involve cooked food alongside raw food, there is less potential for contamination. Just wash your workspace when you are finished before you start preparing other food.
Cooking
Once the sausages are linked, they are very versatile. They can be grilled, baked, boiled, smoked, or pan fried. You can also make delicious meatballs and patties out of unlinked sausage, but the casing keeps sausages juicy and moist while cooking.
Gentle cooking like boiling and smoking keep the casing intact; just be careful not to puncture the casing with a fork or knife while cooking. If the sausage is cooked too hot and fast, the casing will rupture, releasing the juices.
A fully cooked sausage is firm to the touch. They are too small to reliably use a meat thermometer. However, since linked sausages have those casing just holding all the moisture in, there is no harm in cooking sausages longer rather than testing them.
https://www.instagram.com/p/BdpiNBOFDwY/?tagged=homemadesausage
Typically we boil our sausages for 10 minutes, which ensures they are fully cooked, and then brown them in a pan with bacon or vegetables.
Once cooked, take the sausages off the heat and let them rest for five to ten minutes. The hot juices inside the casing should mostly reabsorb back into the meat so that when you cut them open they only leak a little, and the meat is moist and tender. Bon appetit!
To go deeper into the process and find great recipes, there are some excellent books on this topic. The one that lives in our kitchen is Sausage Making: The Definitive Guide with Recipes by Ryan Farr, a chef and butcher in San Francisco.
https://www.instagram.com/p/BeM7Di0Fu6J/?tagged=ryanfarr
Many cities offer butchery classes that may include a sausage making component and are always a great opportunity to learn about meat. If you are feeling overwhelmed by the process, find a friend who wants to experiment with you and make a team adventure out of it.
Sausage making is a worldwide art that ranges from a simple means of preserving and storing meat to an elaborate culinary adventure. If this process catches your fancy, there are plenty of techniques and recipes to experiment with, and it can be a lifelong practice that connects you to your food, quality meat, and the animals that produce it.














I remember my grandmother making sausages! I have to try it even if it looks like a laborious activity. Thank you for the inspiration!
Thank you for the review, Melanie!