If you heat your home with wood, you will inevitably have a bunch of firewood on hand. How much you need depends on a few factors such as where you are located, the particulars of your home’s construction, and your tolerance to cold temperatures.
Regardless of these factors, you will probably have at least a couple cords of firewood lying around (some will have much more than that). And with a cord taking up 128 cubic feet of space, you will need some way to organize it.
That is where stacking comes into play. Stacking firewood is both an art and a science. Some stacks are beautiful to look at, and others are super efficient at drying the wood. Let’s take a look at a few different ways that people have devised to stack firewood.
Random Pile

By far the easiest stack to make is a random pile. Nothing could be easier than throwing the firewood in a pile after you split it. Split … throw … split … throw. Repeat until you are done splitting all your wood. Easy peasy.
This ease does come with a few downsides, however. First of all, it is probably the worst of all stacks for seasoning the wood. The wood that is in the middle of the pile is going to take forever to season, if it ever does, as it has no air flow and no sun exposure (the two main drying forces). Also, the wood that is directly on the ground is going to rot. This is not to say anything of the aesthetic nature of a random, disorderly pile (which is less than desirable).
Wood in a Cage

In this method of stacking, you make a cage to hold the firewood. The easiest cage to build is one of metal fencing. Any sort of welded or woven wire fencing will work with this method, but I have found the woven wire to be a bit easier to work with. All you need to do is cut the fencing to length, and then join the two ends together to get a circular cage.
To figure out how much fencing you need to cut, multiply the diameter of the circle you desire by 3 and you will be pretty darn close. For example, if you want a 4-foot diameter circle, you want a 12-foot length of fencing. Usually, the cut ends of the fencing can be used to join the one end to the other, so you don’t need any other fasteners.
These are quick to put together and easy to set up. Once the cage is put in place, you need to fill the cage. You can do this in an orderly manner if you wish, or toss the wood in there randomly. It looks a whole lot better than a random pile, but the wood in the center still doesn’t dry out well. Making many smaller cages reduces this problem.
Row Stack

A more orderly way of stacking firewood is in a nice row. When stacking this way, you will quickly find that you need something to support each end of the pile, otherwise the firewood will tumble down (which is fine, but the pile will take up more room). These supports can be upright sticks (as in the photo), trees, or any other sufficiently tall and heavy, stationary object.
The big advantage of a single row stack is that it is the best way to season firewood quickly. This is especially true if you position the stack in the sun (unlike in the picture) and orient it so wind blows through the stack. The row helps the two main drying forces (sun and wind) season the wood as fast as possible. And if you happen to have hilly land, get the stack high up on a slope if possible.
Row Stack With Firewood Supports

This is the same as a row stack but instead of needing a tree or other object at each end of the row, you can use firewood itself as a buttress. In order to use firewood as a support, it needs to be arranged like a big Jenga game. That is to say, put a few pieces of firewood down one way, and then the next layer on top of that is placed at a 90-degree angle to the first. Repeat this alternating arrangement until the buttress is as tall as your stack (you actually build it with the stack).
Back-to-Back Row Stacks

This method is just as it sounds – multiple row stacks that are right next to each other.
The main advantage over a single row is that this stack is not as long. The main disadvantage is that it does not dry as quickly as a single row. The row (or rows) in the middle will not dry as quickly as those on the outside as they are shaded by the outside rows, and the wind is buffered by the outside rows as well. If space is at a premium or if the wood is already seasoned, this is a great way to stack wood.
Round Stack

Next up is the round stack. The round stack is a self-supporting stack. As there are no ends to the rows, there is no way for the firewood to tumble down at the ends. To make a round stack, place your firewood in a circle and keep stacking on top of that first circle until you have run out of wood, or the stack is too high to conveniently place more wood. If you want a perfect circle, put a stake in the ground in the middle and attach a string to it. Pull the string taut and place a piece of firewood in line with the end of the string. Work your way around with the string, and you will have a perfect circle.
With the round stack, there are two things you can do: Fill in the circle or leave it empty. If you want to optimize seasoning the wood, leave the center empty as this maximize air flow around the wood. If space is at a premium or you already seasoned the wood, you can fill in the circle with more firewood. Generally, it is just tossed in, but you can be as neat as you want.
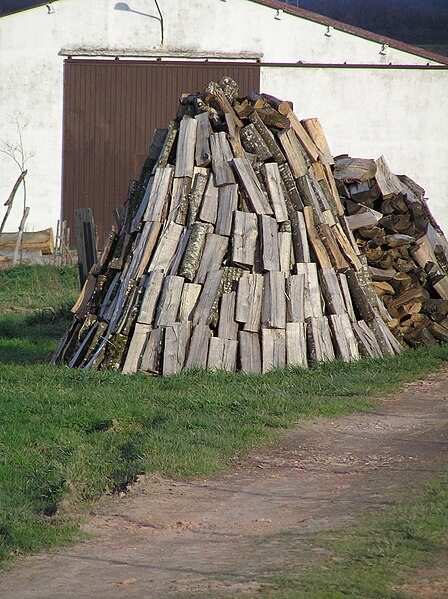
Cone-Shaped Stack

Another self-supporting stack. First assemble a few rows of firewood like in Jenga (as described above in the row stack with firewood supports). Instead of being at the end of the row of firewood, this Jenga pile will serve as the center of the stack. Once you have a small stack made, start leaning other firewood up against the center pile. Then, lean more firewood against the firewood already leaning against the center stack. Keep working your way both up and out until you have a nice tall stack.
There are two very big disadvantages to this pile. The first is that, as with many of the space-saving piles, the wood in the center of the pile will not season particularly well. The outer layers shield the interior wood from both the sun and wind while not letting moisture easily evaporate. The second disadvantage is that the entire bottom layer of wood has one end directly touching the ground which invites rot and will degrade the wood’s potential as burnable fuel.
Stack Under Cover

This is the optimal storage for firewood that is already seasoned. Being under the cover of a roof (and optimally walls) reduces air flow and sun exposure, so the wood will not dry out all that much while stored here. However, it will stay dry. That is a huge boon for having firewood at the ready when you need to use it.
What classifies as cover can be a whole range of things if you don’t have a firewood shed or building. The simplest is a plastic tarp placed over the firewood once it is finished seasoning. A simple upgrade from that is a couple sheets of used (or new if you don’t have any lying around) metal roofing. Whatever you use, make sure to weigh it down so that it doesn’t get blown away!
In Conclusion
Every stacking method has its own advantages and disadvantages. Which one is optimal for you will depend upon your own requirements. I should mention that all stacks can benefit from getting the wood off the ground. For the long rows of firewood, this can be done easily by placing old lumber under the bottom row (used fencing works well for this). For wider stacks, a few sheets of old metal roofing will do the trick. Finally, consider splitting the wood near where you want the stack to be — and avoid unnecessary moving of the wood. That’s all for now. Happy stacking!
This article is updated from an original version by author Kieren Fox.


I like,
I love
this wall of woodenness
beauty and warmth,
very very nice.
Inspiring creativity – both beauty and utility. But some wood boring pests are hard to detect, any easy and safe means to prevent (or remove) them from making home inside (or outside)?
Lovely art in utility. My piles are much more utilitarian.
A trick is to harvest just dead trees, to leave trees standing and to cut trees and then live full log piles for a few years if you don’t have time to cut it all. We burn cull wood from our forest and tend to collect it in spurts every few years, leaving the logs to dry. They would dry faster cut and split but we don’t always have the time to do that during the warm seasons. If we have gathered logs when we can then we block and split as time allows at random times in the year, often during the winter. Frozen wood splits nicely. Wackity-wack.
Fortunately we only burn three quarters cord of wood a year to heat our tiny cottage so it’s easy to put up several years quickly just from dead wood.
Hello!
interested me much information that went up.
I could send everything related to natural building, ecology, whatever is useful for sustainable living ..
Regards, Luciana
Ah … I trducido the Spanish -. Thanks!
As a child in the 50s we would cut up our firewood throughout the year. By summers end we would have a huge pile on the sunny side of our woodshed. Our dad would show us how to make designs as we stacked the wood in the shed. He would have loved these pictures.
Hello sergio from argentina, I would like to ask how they stick the stems, with that material, thank you…
You leave me enchanted by these wonderful woodpiles! Such beauty around us everyday.
Our wood pile/shed is utilitarian. Just finished our wood for the season. We use about 6 cords a year.
has anyone seen tree rounds used as fence posts? I would love to see pictures of fence posts made of tree rounds, ones preferably 2 feet were thicker. I would think that Cedar would be preferred, perhaps they could be stacked by themselves or they could possibly have a course steak and them to hold them up in place. My thoughts were too staple 20 foot sections of hardwire to them. Otherwise I bolts could be screwed into them and they could be wait with carabiners.
Have the same question as Solaris by the way. Curious if anyone has done that.
Check out Norwegian woodstacking. I did it, it is fun and beautiful
Thanks for the article. We’re splitting wood that was left when a company harvested trees on my property. We own 21 acres, and the tress harvested would be impossible for me to haul from the ravine. That said, we were able to secure a bunch of pallets thanks to a good neighbor. We stack the split wood on waist high piles. On top, we place all those pieces that did not split evenly or smoothly. This works for us. Thanks again for the ideas.